Quick start
Overview
This guide walks you through creating a new repository based on the Axis shell application template. The d3studio-web-axis serves as the base for your project, making the setup process faster and ensuring all the required files are included.
How to set up the development environment
Execute the following steps to bootstrap your development environment. At the end of the tutorial, you'll run the whitelabel Deltatre App within dev environments.
1. Create and clone your repository from the d3studio template
-
Visit your organization's GitHub page.
-
Click on the New button to create a repository.
-
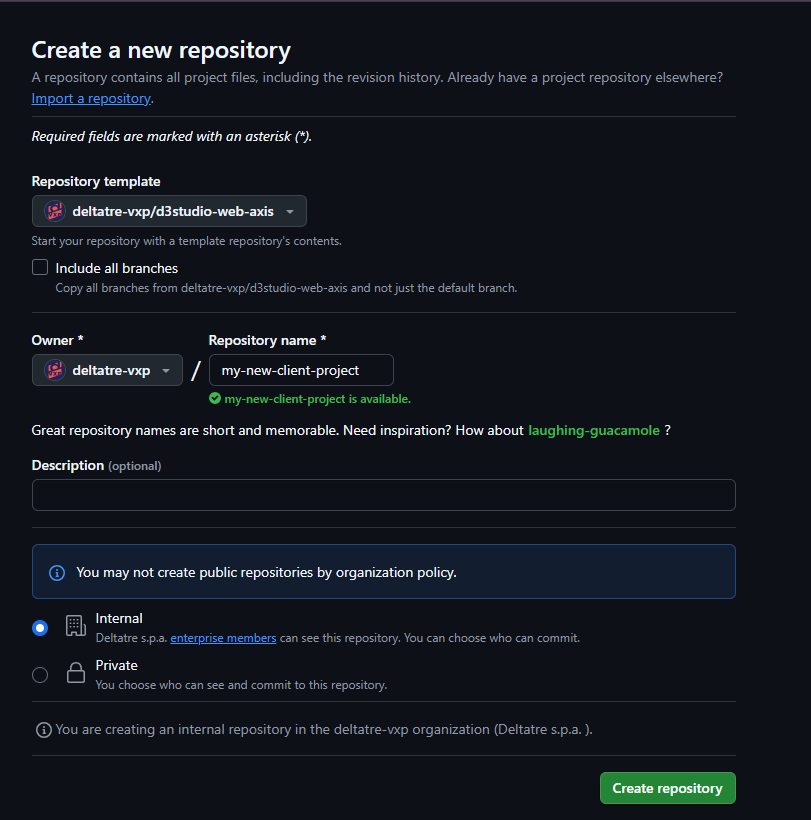
Choose d3studio-web-axis from the Repository template dropdown.
-
Enter a Repository name, add a Description, adjust visibility, then click Create repository.
-
Open a terminal and clone the just created repository locally using SSH:
git clone <repository-url>
2. Installation
-
This project requires NodeJS 16.20.2.
-
install dependencies with
yarn:npm install yarn --global
Note: If you are having multiple repository which uses different node versions, use NVM, which will help you to switch between different versions of Node JS.
3. Setup .npmrc
-
Create .npmrc file to the root of your project, and add below code to it.
@deltatre-vxp:registry=https://npm.pkg.github.com//npm.pkg.github.com/:_authToken=<<your_github_personal_access_token_with_read:packages_scope>>scripts-prepend-node-path=true<<your_github_personal_access_token_with_read:packages_scope>>, replace this line with your PAT token.Generate the GitHub PAT (Personal Access Token) token
- Go to GitHub
- Click on your username and/or profile picture
- Choose Settings
- Choose Developer Settings
- In the left sidebar, click on "Personal access tokens"
- Choose "Tokens (classic)"
- Click on "Generate new token"
- Choose "Generate new token (classic)"
- Add Note and Select Expiration Duration
- Select the required scopes from the list and Click on "Create Token"
- Copy the token and paste it in your
.npmrcfile - [Important] Go to the list of tokens and click on "Configure SSO" option in front of the newly created token. Select "deltatre-vxp" from that list and Authorize.
❗️If you don't see "Configure SSO" option in the token list contact DevOps Team to give you the access for SSO and
deltatre-vxp
4. Using Yarn 3+
If you are using yarn 3+, add the following configuration to your .yarnrc.yml file:
npmScopes:
'deltatre-vxp':
    npmPublishRegistry: https://npm.pkg.github.com
    npmRegistryServer: https://npm.pkg.github.com
    npmAuthToken: <GITHUB_TOKEN>
Again, ensure your GITHUB_TOKEN is authorized for the deltatre-vxp scope with read/write package permissions.
4. Install packages
- Run following comamnd in root of your project:
yarn install
5. Update .env as per the project's requirements:
- In the project root folder, find the
.envfile. This file contains the minimal list of environment variables required for the application’s build and startup. - By default, it replicates
.env-refcontent. - For more information about all available environment variables, visit the All environment variables page.
6. Run application locally:
- Web:
yarn start
- WebTV:
yarn run dev:tv
You have successfully built and run the bootstrap app. Well done!